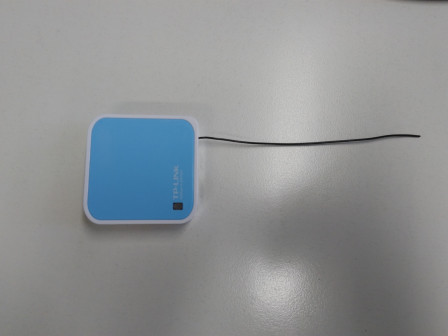
Home automation with cheap 433MHz plugs, a 1$ 433MHz transmitter, and a TP-Link TL-WR703N router
By JC on Saturday 22 October 2016, 17:42 - Hacking - Permalink
Two years ago, I started playing around with cheap 433MHz plugs that can be found almost everywhere. At that time, I got several from different brands, from the well known Chacon Di-O plugs, to the most obscure chinese/no-name ones, and my goal was to reverse engineer as much protocols as possible. I compiled the result into a little tool I called rf-ctrl (now available on my GitHub), and forgot about it. However, this summer, I needed to find a solution to remotely control my electric heaters (not because I was cold obviously, but because I had the time to do it), and thought it was time to dig up rf-ctrl with a bit of polishing (a Web UI called Home-RF).
ON/OFF Keying (OOK)
Let's first talk about OOK a little bit. Most of the cheap 433MHz plugs (but also chimes, rolling shutter controllers, thermometers ...) use the ON/OFF Keying or OOK modulation. The idea is that data are sent in binary form, by alternatively enabling and disabling the transmitter, thus the carrier frequency. I found mainly two ways of doing so:
- coding a 0 with an ON/OFF transition that has particular ON and OFF durations, and coding a 1 with another ON/OFF transition that has other particular ON and OFF durations
Most of the plugs I found use this scheme, and this is the kind of modulation that rf-ctrl implements. This technique, which could be seen as some kind of Manchester code, allows the receiver to easily recover the clock and sync, since the carrier frequency cannot be enabled or disabled longer than a particular amount of time. The timings for a 0 are often inverted compared to those of a 1, for instance, 160µs-ON/420µs-OFF represents a 0 with the OTAX protocol, while 420µs-ON/160µs-OFF represents a 1. However, this is not systematic, and some protocols use totally different timings, for instance 260µs-ON/260µs-OFF for a 0 and 260µs-ON/1300µs-OFF for a 1 with the Di-O protocol. The data part of the frame is sometimes encapsulated between a starting marker and an ending marker. These markers are also represented with an ON/OFF transition, but with different timings. The whole frame is then repeated a specific number of times, with a delay between the frames that can also be assimilated to either a starting marker without ON state, or an ending one with a long OFF state. Last thing to note is the transition order which is often ON/OFF, but can be OFF/ON as well.
- coding a 0 by disabling the carrier frequency for a time Tb, and coding a 1 by enabling it for the same time Tb
This is actually the “real” low-level way of doing OOK things. You can even describe the previous one that way by choosing a bit-rate (1/Tb) high enough to represent the previous ON/OFF transitions by a succession of ones and zeros that will match the timings. This kind of coding is rather found in high-end devices, like old car keys and more secure plugs/rolling shutters. It was not compatible with the HE853 dongle I had at that time, and thus is not supported by rf-ctrl. However I played with it at a point in order to control the rolling shutters and plugs from the Somfy brand, and to test TI's CC110x transceiver, but that's not the purpose of this post.
Reversing the protocol of a 433MHz plug
To replicate a protocol, one must understand two things. The OOK timings (physical characteristics) is the first one and the easiest, while the actual data format of the frame will be the second one.
OOK timings
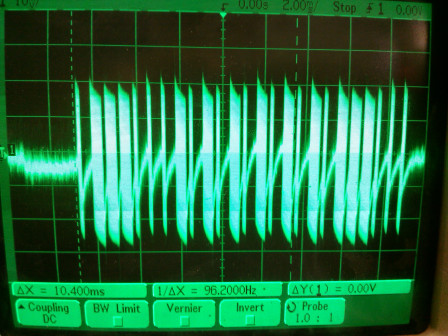
The easiest way to capture a frame is to use a 1$ 433MHz (433,92Mhz actually) receiver connected to either an oscilloscope or a digital analyzer. You will get something like this (Sumtech protocol):

But if you do not have this kind of receiver but have an oscilloscope laying around, you can also use a simple wire of around 17 cm (= 3x10⁸/(4x433x106) = lambda/4) connected to one of the inputs ! You will get something like this, which is enough to understand the underlaying timings (Idk protocol this time):
Thanks to this, you can measure the expected timings and the number of times the frame needs to be repeated. It's time to start writing down zeros and ones on a sheet of paper.
Frame format
Now, what remains is the actual data to send. Most of the time, a frame consists of a remote ID which is the ID of the remote that sends the frame, a device ID which is just the number of the button pressed on the remote, an action, like ON or OFF, which is most likely 1 or 0, some kind of checksum, and some fixed values. In some cases there are additional values that change every time a button is pressed. They are called rolling codes, and are found in brands like Somfy. This kind of codes are often harder to reverse, but the cheap plugs do not use that ;-). Finally, some protocols add a simple obfuscation layer on top of the frame, like a XOR for instance.
To understand a protocol, the best method remains to gather as much frames as possible, while writing down what generated them.
The first step is to determine if two frames generated by pushing the same button are indeed the same. It will most likely be the case, but if not, you need to find out which part of the frame changes. It can be a simple counter, or something more clever. Remember that if there is some kind of encryption/obfuscation, the whole frame can change because of a simple counter. Anyway, you need to scratch your head and find the solution by comparing as much frames as possible.
Assuming all frames generated by one button are the same, the next thing to do is to change one parameter at a time, and look at the result to identify the different fields. For instance, press the ON and OFF button of the same plug number, on the same remote, and compare the resulting frames. Only a small part of it should change, part that you can now identify as the action field.
Then press the ON button for another plug, and compare to the ON button for the first plug. Check that 1) the action field remains the same, 2) something else changed. This something else is probably the device ID.
You can then try to open the remote, and look for some kind of multi-switch or jumpers. You will not necessarily find something in all remotes since some will have their ID stored in an Eeprom or something like that, but if you do find something, try to change it and check the generated frames. This will most likely help to find the remote ID.
If you see a part of the frame that seems to change only when something else changes, then you might just have identified a checksum. Try to find how these bits can be computed from the other ones. It can be a for instance a simple sum, or a XOR.
Repeat the procedure until you are convinced that all those fields behave as assumed.
Now, keep in mind this is just a generic description of a 433MHz device. Some will not fit the mold and might have, for instance, more or less fields. The frame format can even be completely different.
Once the frame format understood, it's time to test ! For this you will need a 433MHz transmitter. I first used this HE853 USB dongle, which works fine with a regular PC, but I found out it was easier to just use this 1$ transmitter connected to a Raspberry PI, a TP-Link TL-WR703N router, or any device that offers GPIOs. And this is where rf-ctrl comes in handy. It uses a back-end/front-end (transmitter driver/protocol driver) logic allowing to implement new protocols easily.
Here is how to do so:
- copy an existing protocol like auchan.c as <my_protocol>.c and add it to the Makefile by appending <my_protocol>.o to the
OBJECTSvariable - fill in the
timing_configstructure with the values you measured (values are expected in µs) - implement the
int (*formatcmd)(uint8t *data, sizet datalen, uint32t remotecode, uint32t devicecode, rfcommandt command);function which is supposed to generate the final frame in the pre-allocated*dataarray ofdata_lenbytes from the remote ID, the device ID and the command. - fill in the
rfprotocoldriverstructure with a short and long name for the protocol, the pointer to theformat_cmd()function and to thetiming_configstructure, the max allowed remote and device IDs, and the actual parameters this protocol needs (most likelyPARAMREMOTEID | PARAMDEVICEID | PARAM_COMMAND) - add your new protocol to the
struct rfprotocoldriver *(protocol_drivers)list in rf-ctrl.c
That's all ! You should be able to build rf-ctrl and control your plug with it. If it does not work, do not hesitate to check the generated signal with your oscilloscope or digital analyzer.
Controlling my electric heaters remotely
Let's get back to the main topic. To control my heaters, I thought I would buy plugs from one of the brands I already reversed, and went to buy the "auchan" ones. Unfortunately, they were still selling 433MHz plugs under the same name, but the underlaying supplier had clearly changed. I decided to buy three of them anyway, but knew I would have to reverse yet another protocol, with the risk it might have used some kind of rolling codes... Hopefully, it did not, and was pretty straightforward to understand. For your information it's the protocol I called "auchan2".
Now regarding the actual setup, I used the well known TP-Link TL-WR703N router running OpenWrt and a 1$ 433MHz transmitter (again, like this one) connected, through a 2V -> 5V level shifter, to the GPIO 7 of the router. I wrote the needed Makefile to build rf-ctrl as an OpenWrt package, and also created a kernel driver that generates the proper OOK signal on GPIO 7 once fed with the correct timings and data. This driver, called ook-gpio, is directly provided as an OpenWrt package on my GitHub. Since the WR703N does not have much free space, I chose to build a special firmware for it with everything in it, removing what was useless.
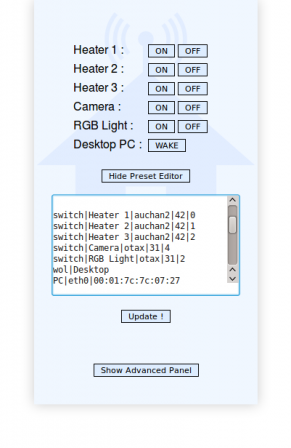
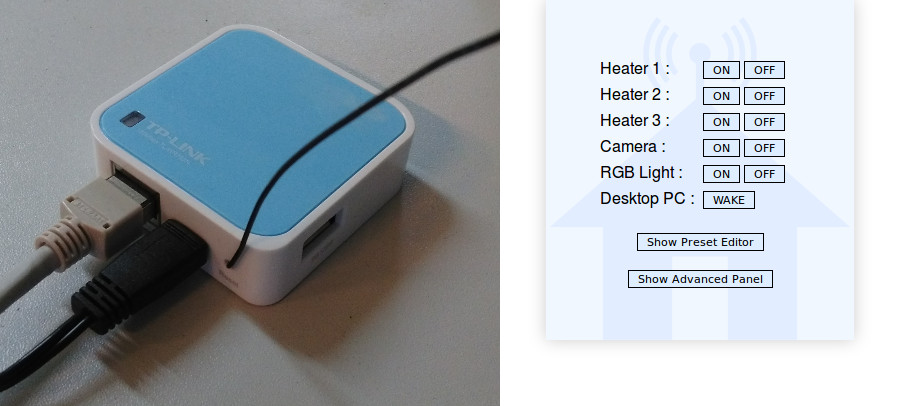
Once the firmware flashed, I verified that I was indeed able to control my heaters. But to do that remotely, I had to connect trough SSH and use my command line tool, which looked like something that could have been improved. So I made a little Web UI called Home-RF, which is a little shell script that allows to control rf-ctrl by generating a web page with configurable presets. It looks like this:
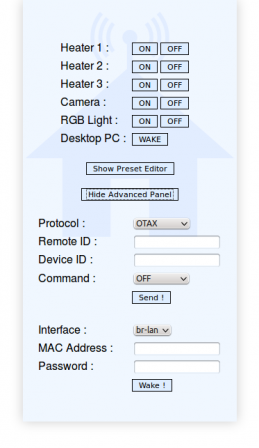
The idea is that you can add presets for devices like plugs, rolling shutters or chimes, and they will be displayed like a remote. As a bonus, It also supports WakeOnLan compatible computers (using etherwake). There is a simple preset editor included in the interface, as well as an advanced panel that allows to manually control rf-ctrl or etherwake. Home-RF will be nicely displayed on a PC, as well as on mobile phones. It is available here on my GitHub, and can be built as an OpenWrt package.
At that point, I rebuilt a firmware with Home-RF inside, and flashed it. I'm using a VPN at home, so I do not care about authentication directly in Home-RF. However, if you plan to use it remotely, do not forget to add some kind of access control on top of it (htaccess, SSH, VPN...) ! I will explain later how to use the basic authentication system of uhttpd.
How-to do the same
In order to build your own RF gateway, you will need:
- a TP-Link TL-WR703N router that you can find here for instance
- a 5V 433MHz transmitter like this one
- an N-MOSFET in enhancement mode with a threshold voltage smaller than 2V for the level shifter (I used this BSS138)
- one 10k Ohm resistor
- a 17,3cm long wire for the antenna
- a 3 pins female connector with 2.54mm pitch (optional)
- a piece of prototyping PCB
- some wire
- some Kapton
The provided instructions assume you are working on a PC running Linux.
First, the hardware
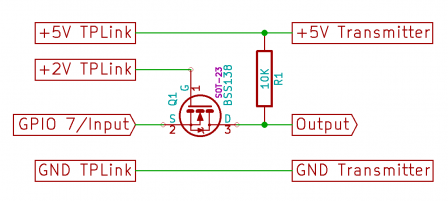
The schematic for the level shifter is the following:
- Solder the MOSFET and the resistor to match the schematic above
- Use one pad of the PCB as Ground, and solder three wires on Output, +5V Transmitter, and GND Transmitter
- Either solder the 3 pins connector to the other end of the wires, or solder the RF transmitter directly (remove the male pins of the transmitter if any)
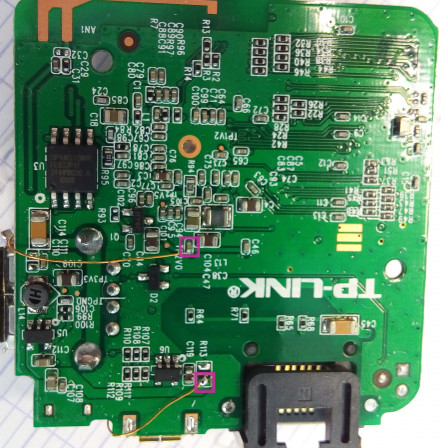
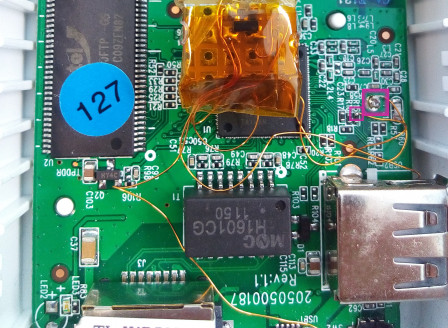
- Open the WR703N router, and look for the four signals below:
- Gnd is on a little pad, top side of the PCB
- GPIO 7 is on R15, top side of the PCB
- +2V is on C47 (or TP2V0), bottom side of the PCB
- +5V is on R113, bottom side of the PCB
- Solder one end of four wires on these signals, and the other end to the level shifter previously made
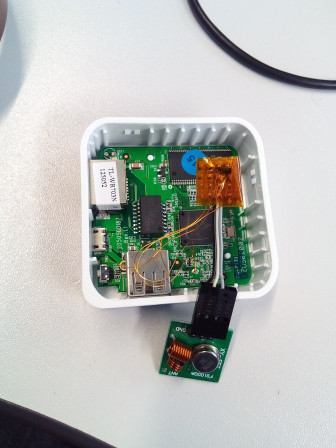
- Solder the 17,3 cm long wire to the antenna pad of the transmitter and put Kapton everywhere to prevent any short-circuit (I tried without antenna at first, that's why it is missing on my picture)
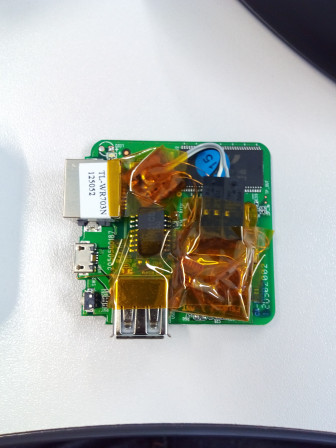
- Put the board back in its casing, use its reset hole to get the antenna out of it (you will have to bend the antenna to do so, so make sure it does not push the reset button), and close it
You should get something like this:
Now, the software
I attached a prebuilt Barrier Breaker (14.07) OpenWrt firmware with all the tools in it, but it is funnier to build it yourself:
- Create your root folder for the build, for instance my-gateway:
$ mkdir my-gateway
- Go to that folder, and checkout a Barrier Breaker OpenWrt tree (I did not try Chaos Calmer, so let me know if it works):
$ cd my-gateway
$ git clone -b barrier_breaker git://github.com/openwrt/openwrt.git
- Checkout rf-ctrl v0.5, Home-RF v0.6 and ook-gpio v0.2 (these versions are known to work, but feel free to test more recent ones):
$ git clone -b "v0.5" https://github.com/jcrona/rf-ctrl.git
$ git clone -b "v0.6" https://github.com/jcrona/home-rf.git
$ git clone -b "v0.2" https://github.com/jcrona/ook-gpio.git
- Create the packages folders in OpenWrt:
$ mkdir -p openwrt/package/utils/home-rf/files
$ mkdir -p openwrt/package/utils/rf-ctrl/src
$ mkdir -p openwrt/package/kernel/ook-gpio
- Copy the packages content:
$ cp -a home-rf/www openwrt/package/utils/home-rf/files/
$ cp home-rf/OpenWrt/Makefile openwrt/package/utils/home-rf/
$ cp rf-ctrl/* openwrt/package/utils/rf-ctrl/src/
$ cp rf-ctrl/OpenWrt/Makefile openwrt/package/utils/rf-ctrl/
$ cp -a ook-gpio/* openwrt/package/kernel/ook-gpio/
- Update external feeds in OpenWrt and add etherwake to the build system:
$ cd openwrt
$ ./scripts/feeds update -a
$ ./scripts/feeds install etherwake
- Download the attached home-rf_openwrt.config into the my-gateway folder, and use it:
$ cp ../home-rf_openwrt.config .config
$ make oldconfig
- Build the OpenWrt firmware
$ make
- You should have your firmware ready in my-gateway/openwrt/bin/ar71xx/.
If you have any issue buidling the mac80211 package, it might be because the build system failed to clone the linux-firmware Git. In that case, download the linux-firmware-2014-06-04-7f388b4885cf64d6b7833612052d20d4197af96f.tar.bz2 archive from here, copy it into the my-gateway/openwrt/dl/ folder, and restart the build.
Now, you need to flash your WR703N router. If you never flashed OpenWrt before on your router, use openwrt-ar71xx-generic-tl-wr703n-v1-squashfs-factory.bin as explained here. Otherwise, use openwrt-ar71xx-generic-tl-wr703n-v1-squashfs-sysupgrade.bin with the sysupgrade tool.
Final touch
At that point, you should have your router up and running. You still need to configure it like a regular OpenWrt router, as explained here. You can, for instance, configure it in WiFi station mode, so that you can find the best place to reach all your 433MHz devices.
Once properly configured, open a browser and go to http://<yourrouterip>/home-rf. If everything went well, you will get the Home-RF interface ready to be configured !
If you want to add basic authentication to Home-RF, open an SSH connection to the router, and run the following commands on it (replace username and password by the username and password of your choice):
# echo "/cgi-bin/home-rf:username:$(uhttpd -m password)" >> /etc/httpd.conf
# /etc/init.d/uhttpd restart
Final words
So now I'm able to control my electric heaters from my phone for around 20$, and I hope you will be able to do the same with your own 433MHz devices. All the discussed tools are available on my GitHub. I will be happy to extend the list of supported protocols in rf-ctrl, so feel free to add more.
If you want to play around, try the "scan" mode of rf-ctrl ! It allows to send all possible frames within a range of given remote IDs, device IDs, and protocols.
That's all for now !
